ShopDreamUp AI ArtDreamUp
Deviation Actions


Suggested Deviants


Suggested Collections


You Might Like…


![[ Tutorial ] Katsu's quick guide to hands](https://images-wixmp-ed30a86b8c4ca887773594c2.wixmp.com/f/ca2be8a2-d5e0-411e-99de-322e1d34c596/d73v1iq-6d99d84b-abbb-44f4-b68e-5ccdb4ae5f90.png/v1/crop/w_184,h_184,x_0,y_153,scl_0.22660098522167,q_70,strp/__tutorial___katsu_s_quick_guide_to_hands_by_miiroir_d73v1iq-92s-2x.jpg?token=eyJ0eXAiOiJKV1QiLCJhbGciOiJIUzI1NiJ9.eyJzdWIiOiJ1cm46YXBwOjdlMGQxODg5ODIyNjQzNzNhNWYwZDQxNWVhMGQyNmUwIiwiaXNzIjoidXJuOmFwcDo3ZTBkMTg4OTgyMjY0MzczYTVmMGQ0MTVlYTBkMjZlMCIsIm9iaiI6W1t7ImhlaWdodCI6Ijw9MzUwNyIsInBhdGgiOiJcL2ZcL2NhMmJlOGEyLWQ1ZTAtNDExZS05OWRlLTMyMmUxZDM0YzU5NlwvZDczdjFpcS02ZDk5ZDg0Yi1hYmJiLTQ0ZjQtYjY4ZS01Y2NkYjRhZTVmOTAucG5nIiwid2lkdGgiOiI8PTgxMiJ9XV0sImF1ZCI6WyJ1cm46c2VydmljZTppbWFnZS5vcGVyYXRpb25zIl19.NiJvTP-9_EtE9hCOhuoXCDipA4gVjiHvWkiUzF426gU)
![[ Tutorial ] Katsu's quick guide to hands](https://images-wixmp-ed30a86b8c4ca887773594c2.wixmp.com/f/ca2be8a2-d5e0-411e-99de-322e1d34c596/d73v1iq-6d99d84b-abbb-44f4-b68e-5ccdb4ae5f90.png/v1/crop/w_92,h_92,x_0,y_76,scl_0.11330049261084,q_70,strp/__tutorial___katsu_s_quick_guide_to_hands_by_miiroir_d73v1iq-92s.jpg?token=eyJ0eXAiOiJKV1QiLCJhbGciOiJIUzI1NiJ9.eyJzdWIiOiJ1cm46YXBwOjdlMGQxODg5ODIyNjQzNzNhNWYwZDQxNWVhMGQyNmUwIiwiaXNzIjoidXJuOmFwcDo3ZTBkMTg4OTgyMjY0MzczYTVmMGQ0MTVlYTBkMjZlMCIsIm9iaiI6W1t7ImhlaWdodCI6Ijw9MzUwNyIsInBhdGgiOiJcL2ZcL2NhMmJlOGEyLWQ1ZTAtNDExZS05OWRlLTMyMmUxZDM0YzU5NlwvZDczdjFpcS02ZDk5ZDg0Yi1hYmJiLTQ0ZjQtYjY4ZS01Y2NkYjRhZTVmOTAucG5nIiwid2lkdGgiOiI8PTgxMiJ9XV0sImF1ZCI6WyJ1cm46c2VydmljZTppbWFnZS5vcGVyYXRpb25zIl19.NiJvTP-9_EtE9hCOhuoXCDipA4gVjiHvWkiUzF426gU)


Featured in Groups


Description
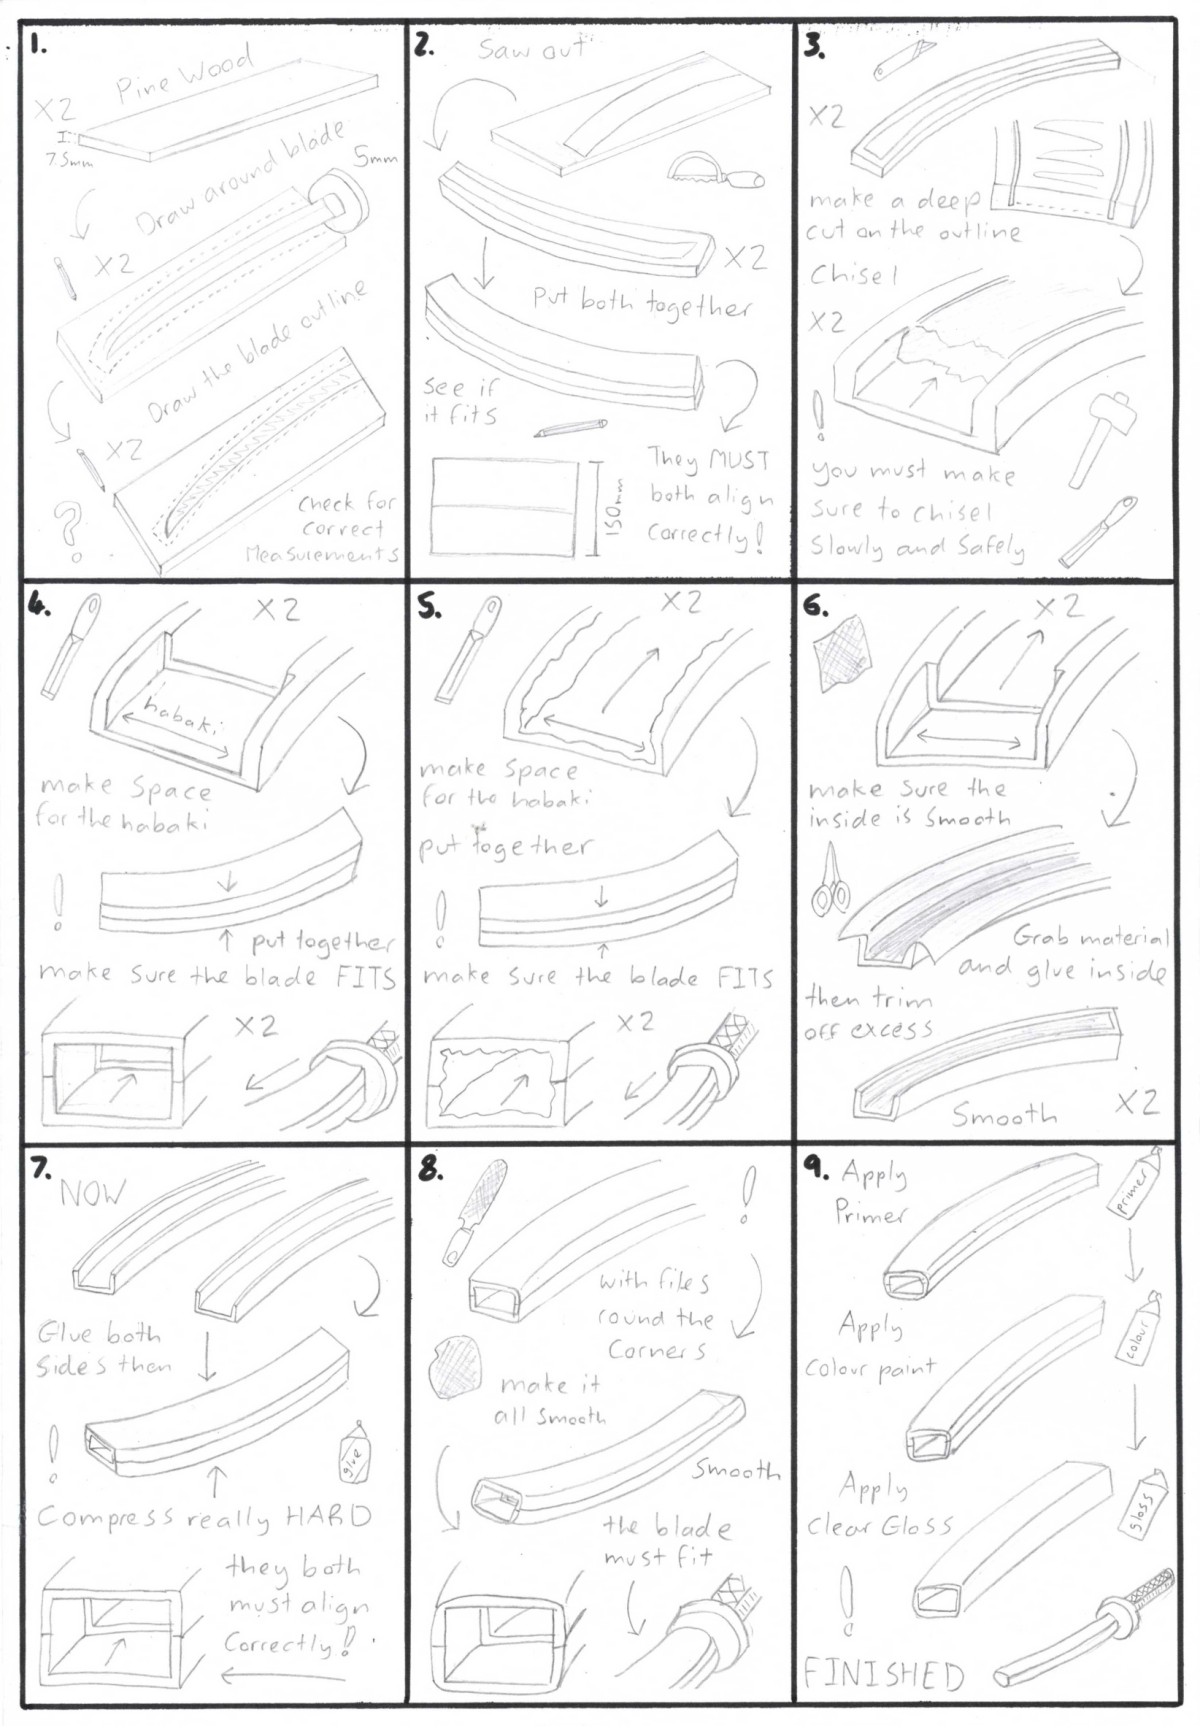
Many of you have asked for a "how to make a scabbard" tutorial, so I have decided to draw it up with my doodle like tutorials. There are in total 3 different ways to make a scabbard successfully.
Trench Carving is by far the strongest type of scabbard that you can make for your katana. It is how you tradationally you make scabbard's for actual katana's. However the downside is, it is the most time consuming, and requires the most skill. So by far this is the hardest way to make a scabbard.
Step 1: Get a sheet of strip pine wood thats atleast 7.5mm in thickness its lengh can be anything longer then the lengh of the blade for now. Get the blade of the sword and lay it down on the pinewood. Then draw an outline of the blade atleast 5mm away from the actual blade. The end of the scabbard should be squared.
Step 2: Grab a coping saw and then cut out both of the scabbard parts from the pine wood. Make sure to use sandpaper to make sand off the rough edges. Now put one on top of the other and make sure they align correctly and the total thickness is 15mm. If it is not aligned correctly sand it until it is in shape.
Step 3: With a craft or x-acto knife make a deep score or cut across the outline of the scabbard on both parts of the pinewood. This will act as your guide line. Then with a hammer and chisel slowly and carefully start chiselling away the excess wood in the center of the scabbard. Be very carefull as to not destroy the pinewood.
Step 4: Now the habaki must fit snuggly onto the entrance of the scabbard. So chisel out some room for the habaki to slide and lock into place. Then put the scabbard pieces together and check if they are aligned correctly. Then you must test and see if the blade from the katana can slide through easily and the habaki.
Step 5: Alternatively you could just be very rough with the chiselling. Instead of being accurate you can just roughly with chisels just carve out the inner wood until the blade slides into the sheath when combined. This saves alot more time but the chances you destroy the pinewood is alot more when your not carefull.
Step 6: Sand the inside of both of the scabbard parts so that it won’t scratch the paint work of the blade. An alternative is to line the inside of both of the scabbard parts with a fabric like suede to protect the blade as it slides in. Cut the fabric to appropriate length and glue it into position. Then slide the blade in to test.
Step 7: Once you have made sure the scabbard parts align perfectly, glue both pieces of the parts together with wood glue. Now make sure to compress hard when the glue has been applied of the. Wait for the glue dry before moving on. If you rush it and the scabbard is not aligned correctly, start again.
Step 8: Now with hand files round all the sides of the scabbard until it is oval shaped. Then use grades of sandpaper from the most course to the most fine to smooth the sheath. The scabbard should be as smooth and round as possible. The sides of the scabbard can be covered with wood filler.
Step 9: Finnaly, Apply white primer spray paint. Apply several coats until grain is not visible, the inside is not needed. Next apply the appropriate coat of coloured spray paint. Then finally apply a hard protective clear gloss on the sheath. Once everything is finnaly dried you can test if the blade slides into the scabbard parfectly
Image size
1200x1731px 312.18 KB
© 2008 - 2024 chioky
Comments106
Join the community to add your comment. Already a deviant? Log In
quick question! I have a katana that does NOT have a... Habaki I belive you called it? anyways, to get to my point how would you get the Katana to stay in firmly, but not to tight to pull out easily?